Background
My interest in veneering began back in the summer of 2012. Two woodworking forums that I was participating in had veneer sections. It was there that I discovered that many woodworkers were involved in veneer work of one sort or the other. I became intrigued and the trap was sprung. Bam! Gotcha!
Up to that time I had never even touched a sheet of veneer. My recollection of veneer was that it was a great way to 'camouflage' inferior wood used to make furniture. While the pieces that I recall seeing appeared new and shiny in the furniture showroom, they each had 'tacky' written all over them. Given those recollections, it is little wonder that I never gave much thought to starting a veneer project.
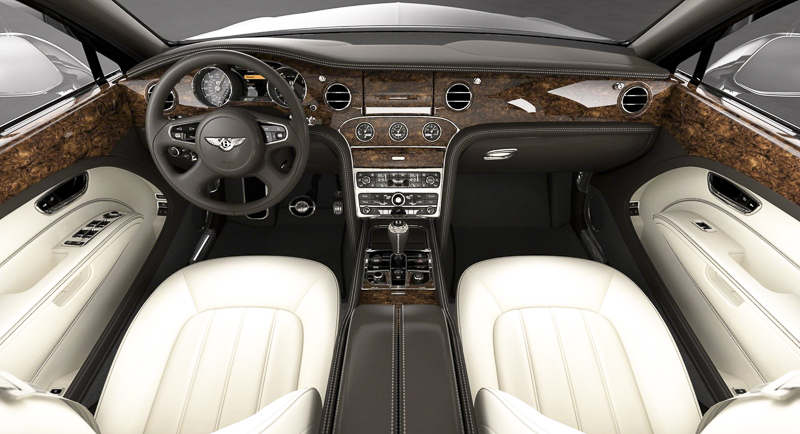
Today, quality veneer pieces can be found in a few select galleries, shops or websites. Just browse a few of the incredibly veneered jewelry boxes that skilled woodworker's are crafting or poke your head into one of todays luxury vehicles and you'll probably see exotic veneer on the dash and doors and, in some cases, you may even see it wrapped around the steering wheel.
This newfound interest in veneer prompted me to craft my wife a large jewelry box. She loves (and makes) jewelry, so extra storage space is always welcomed. This would be the perfect project for using veneer. I got to work and completed the basic design. However, I had absolutely no idea how twisty the road ahead was going to be.
Introduction
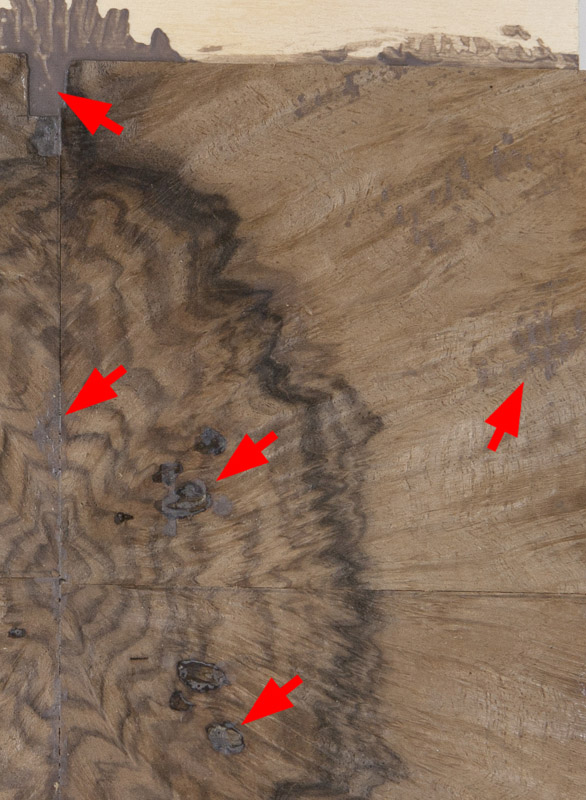
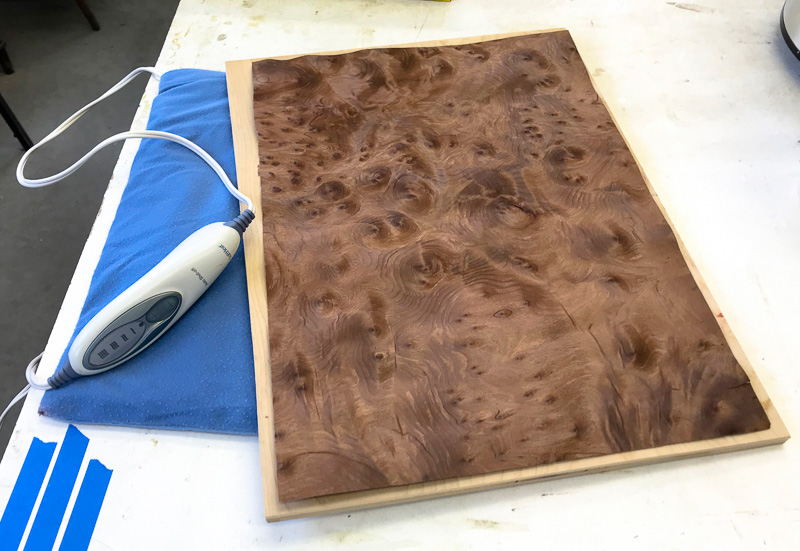
Before I continue, I want to be PERFECTLY CLEAR about something: I use nothing but hot hide glue in all of my veneering projects. In the past I tried using a 'extra dark', brown PVA wood glue for a walnut veneer test board. As I suspected, the glue seeped through the walnut burl veneer leaving non-blending brown smudges across the veneer. See the following image.
I wanted to have the experience of using this type of glue on the veneer that I normally use. The purpose of this webpage is not to debate the merits - pro or con, of various verneer adhesives. I have had amazing results using hot hide glue and that is all that matters to me. We each have our own preferences.
Veneering is an immensely fascinating and historic aspect of woodworking. Briefly stated, veneering is the process of covering a substrate with highly figured sheets of very thin wood. Most veneer is about 0.75mm thick. For a glimpse of what types of wood veneer is available take a look at what Veneer Supplies has in stock.
There is a ton of information on every aspect of veneering on the internet. You may find some of this information useful - or not. Like most other endeavors in life, the best information always comes from learning from your own experiences, good and bad. I'll do my best to keep you from making the same mistakes I did.
It doesn't take much imagination to realize how a craftsman can turn a ho-hum jewelry box or table top into a work of art with the careful application of veneer. The possibilities with veneer are absolutely endless.
I will cover the following veneer subjects:
- Veneer Preparation
- Veneer Trimming
- Traditional Hide Glue
- Vacuum Press
- Veneer Hammer Technique
- Veneering Ironing Technique
- Book-Matching
- Pore Filling and French Polishing
- Veneer Repair
- Resources
Select any of the above links for more info on each subject.
Veneer Preparation
Before you begin working with veneer you want your sheets to be as flat as possible. For instance, if you are going to book-match two veneer sheets they are impossible to trim and align unless both are as flat as you can get them. In general, veneer is usually delivered flat. If your veneer arrives wavy, then you have no choice but to flatten it before you continue.
Veneer Flattening Methods
There are countless methods for flattening veneer. I prefer distilled water because there is no mess and it works everytime. In my case, the flattening process begins by spraying the sheet on both sides with water so that it is well soaked. After several minutes of soaking the veneer sheet will become pliable. I then lay the sheet between paper towels and place these between flat boards of appropriate size. Weigh or clamp the boards down. The paper towels should be replaced every few hours with dry paper towels and weighed/clamped down again. The basic idea is to keep sufficient weight on the boards so that the sheet remains flat when dry. Keep replacing the paper towels until the sheet is completely dry. Once the sheet is dry and flat you are good to go. Keep in mind that the sheet may begin to curl back to its original shape if it is not bonded to a substrate within a few hours or so. Your ambient humidity will determine how quickly this occurs.
I place my veneer and paper towels between two 3/4-inch melamine boards because melamine is thick, heavy and more importantly, is impervious to water. An alternative would be to lay plastic kitchen wrap between your boards and the paper towels. Sections cut from an inexpensive painter's plastic drop clothe would work just as well. A warm iron can also be used to flatten and dry veneer. I go into this method later.
Veneer Flattening Solutions
An alternative to using plain water is to soften veneer with a softening liquid of which there are many. Here is a link to Richard Jones' veneer flattening solution recipes. Mr. Jones is a well established woodworker in the UK whose work can be seen here. There are also commercial softening solutions which can be tried. I am guilty of trying one. The label had a warning "... use in a well ventilated area." In short, it left an undescribeable oily, chemical residue on the veneer. It also claimed to not have any affect on any finishing application. While that may (or may not) be true, the same can be said with certainty of plain old water. I am in no way condeming the use of chemical veneer flatteners. To date, water works perfectly for me. So until such time that it does not, I will continue to use it.
Veneer Trimming
There are two general types of veneer trimming: rough and precise. A rough cut is done to remove the section of veneer that you will use from the leaf that contained it. A precise cut is one you will make, for example, when you are cutting a common edge for a book match. If the veneer leaf is dry and flat, then I would make the rough cut with whatever tool was available. The precise cut, on the other hand, should be made with the saw or knife that you have the most confidence in. This tool should be guided by a metal rule or a straight edge of some sort. Many woodworker's final sand their precise edges. I find this odd and will explain why shortly.
If I just dampened veneer to flatten it, then I would make the rough cut in this state, but I would never make a precise cut with damp veneer. Water expands the veneer and making a precise cut will be a waste of time. If you do this you most assuredly discover that your laser straight cut will not be straight when your veneer is dry. I suggest that you determine this for yourself. Experiencing this can save you a lot of grief in the future.
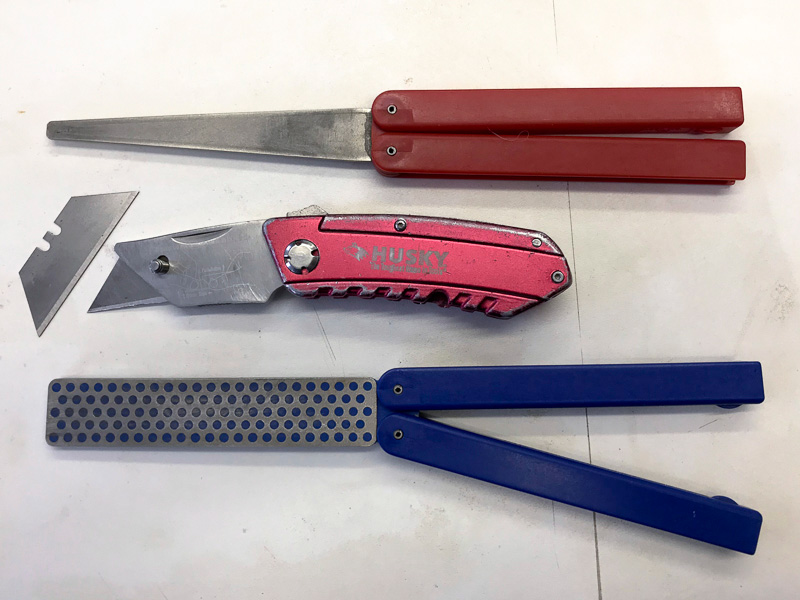
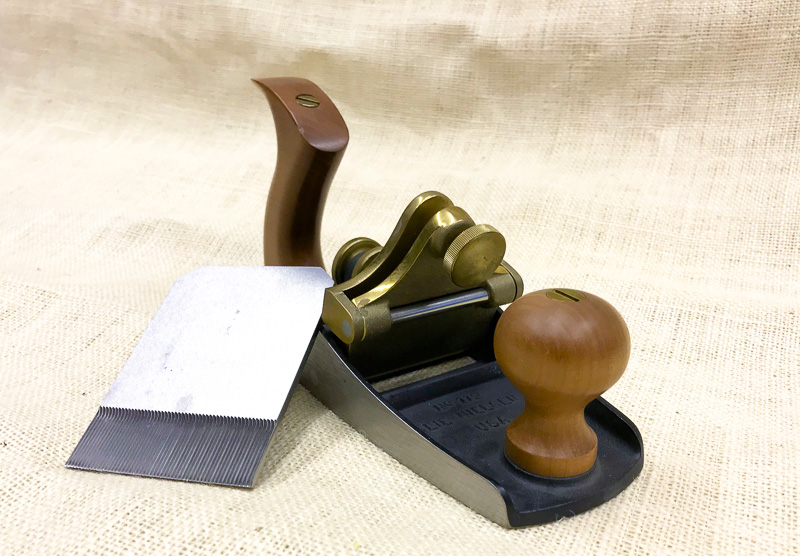
There are many ways to trim veneer. Some use power tools such as track saws and routers. Some use veneer saws like those pictured below. Others use planes or knives. The methods are nearly endless. While I considered all of these, I prefer to keep things simple and use hand tools as much as I possibly can. I'll explain.
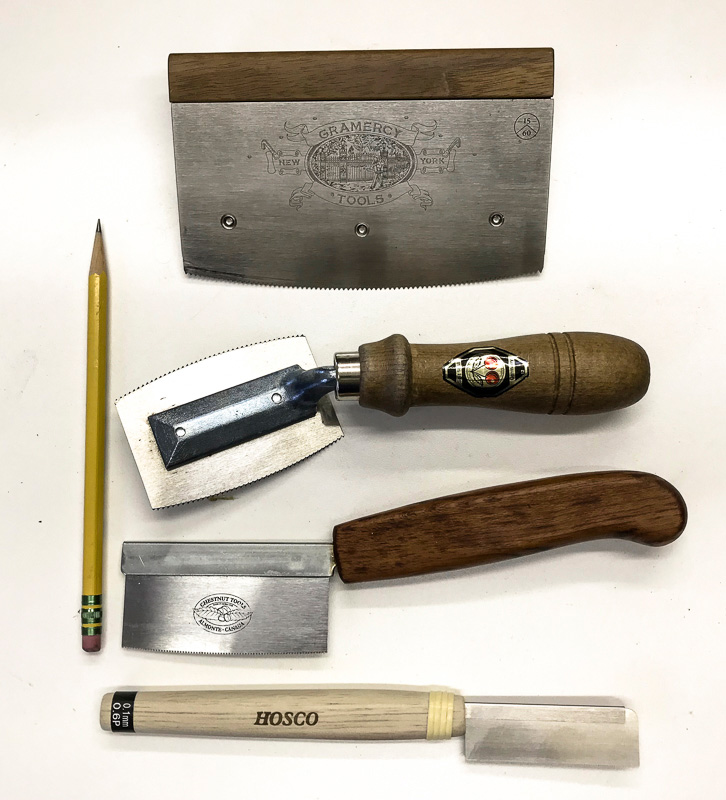
Veneer Saws
Veneer saws like those pictured above work extremely well for cutting or trimming veneer. In general, a straightedge is used to guide the veneer saw as you make your cut. I prefer to place the strightedge on the face of the veneer I will be using. If the saw wonders away from the edge it will do so on the waste side of the veneer preventing a setback to your project. This is expecially true when using a knife to cut veneer. A knife tends to follow the grain of the veneer and will very easily wonder away from your straightedge.
I have used all of the veneer saws shown above. While they all do a good job of cutting veneer, they each have their own inherent quirks and take some getting used to.
Gramercy Veneer Saw
This is the largest veneer saw that I own. It cuts veneer extremely well, but is much heavier than the other veneer saws I use. This weight is not, IMO, a drawback. This saw is of French origin and is probably the oldest and most widely used veneer saw in use today. In truth, I purchased the Two Cherries and the Chestnut Tools veneer saws to determine if they would be an improvement over this saw. They are all unique and I find each of them useful. I will also note that this saw is the most expensive of my veneer saws.
Two Cherries Veneer Saw
This is a great veneer saw and although it appears awkward, it is actually quite ergonomic.
Chestnut Tools Veneer Saw
This is an excellent veneer saw and it, too, feels good in the hand when cutting. More info can be found here
Hosco Veneer Saw
This is the tricky one. I purchased it because its kerf is 0.1 mm (no set) and it has, obviously, the thinnest kerf of all of my veneer saws. Using it takes a bit of practice. I have found that this little saw prefers a gentle touch when cutting veneer. This is a wonderful little luthier saw. I purchased it specifically for a project that requires the smallest kerf possible.
I have no favorite veneer saw. If I were cutting two or more veneer sheets at once, I would reach for the Gramercy because of its mass. All of the saws cut just fine. If I had to cut veneer all day long I might have a different spin on these saws, but from my experiences to date, they are all great veneer saws.
Lastly, I think that the taller the saw is, for instance the Gramercy vs the Hosco, the easier it is to tilt the saw away from verical. Tilting the saw may not be as critical an issue when sawing veneer as it would be with a veneer knife. Also keep in mind that these saws must be kept sharp, so you must learn to sharpen them.
Veneer Knives
I was very skepical about cutting veneer with a knife. I visualize a knife as a very narrow wedge plowing through the veneer. Because a knife does not remove material such as a saw does, it has to force the wood to both sides of the knife blade as it cuts the veneer which, IMO, stresses the wood fibers. A knife will also follow the grain and divert the cut away from your straightedge if you are not careful. In some cases this can be very problematic. Either way, you lose control of the cut and losing control is never a good thing.
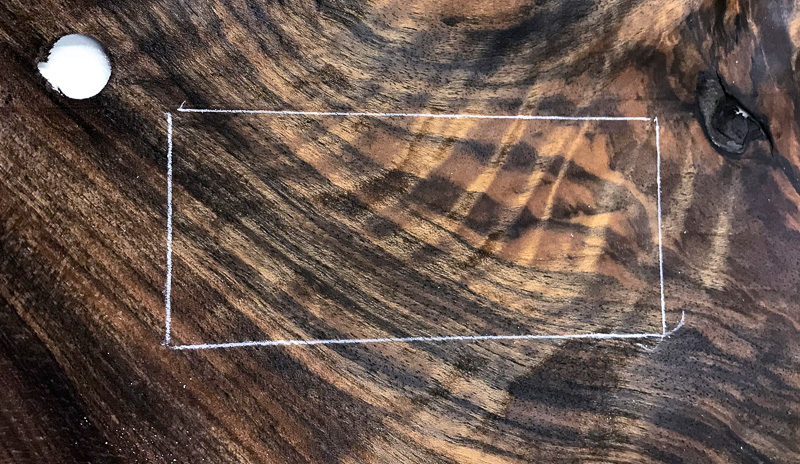
Before I wrote this webpage, I was faced with a serious challenge: I had to learn to cut drawer faces (rectangles) out of a book-matched walnut veneer sheet that was going to be bonded to the face of a jewelry box I was making. The drawers fit very tightly which meant that if I used a veneer saw there was a very good chance that I would remove veneer that I would regret later due to the width of the saw kerf. I was not sure I wanted to take that chance. So I did some testing with a utility knife. A utility knife has no kerf and thus, its cut does not remove any veneer. What I learned absolutely suprised me. Shocked, is probablby more discriptive. I will explain.
I dampened the veneer thoroughly before I began. I believe that softened veneer would allow the knife to make an easier cut in the veneer. I sharpened my knife blade with a coarse diamond sharpener. I did not want the knife sharpened too smoothly such as I would do, for instance, for a plane iron. I wanted it sharp, but with a somewhat rough edge, so I used a 325x diamond hone only. I felt that the abrasive edge would help the cut by removing a minute amount of wood as the knife made its cut thus reducing stress on the surrounding veneer.
After this preparation, I made my cut. Now, normally, when making a cut, you begin the cut on the far side of the veneer and then follow through directly against your straighedge. In this case I could not do that because I was cutting rectangles (the drawer faces) from within the book-matched veneer. I had to begin my cut in a corner of one of the white penciled rectangles. I made a gentle first cut making certain that I stayed directly against my straightedge. I completed the cut on the third pass. I was speechless. More importantly, my cut was true and absolutely no veneer was wasted making the cut.
This experience totally changed my perception of using a knife to cut veneer. Needless to say, cutting out the drawer faces from the book-matched veneer went very, very well. I learned a huge lesson in the process.
What the heck ...
If you've been paying attention, above I noted that it was not a good idea to make a precise cut in wet or damp veneer and here, I did just that using a knife, no less. You're right, of course, but I had several good reasons for doing this. First of all, I did not want to lose any veneer due to a kerf, no matter how slight this would have been. Secondly, I needed a knife to make this 'kerf-less' cut and a knife always makes a better cut in damp veneer
Glass Plate Method
At the moment, this is purely experimental. More to come on this in a few days.
The main concept is this: Using wooden blocks to sand against to bring two book-matched veneer sheets into perfect alignment is a tried and true method. I have tried this on an experimental basis and it does work fairly well. I do not like it for the following reasons: (1) The sanded edges are left fuzzy; (2) sanding the boards used to hold the veneer will soon not be true because of sanding done against them and (3), sanding two sheets of veneer at once means that the book-matched surfaces are folded against themselves which means that you cannot see the seam line that you are most interested in.
Using glass and a very sharp chisel is entirely different. First of all - and more importantly, I can actually see the seam line I want to cut. Secondly, the chisel will not destroy the glass edge when it cuts the veneer.
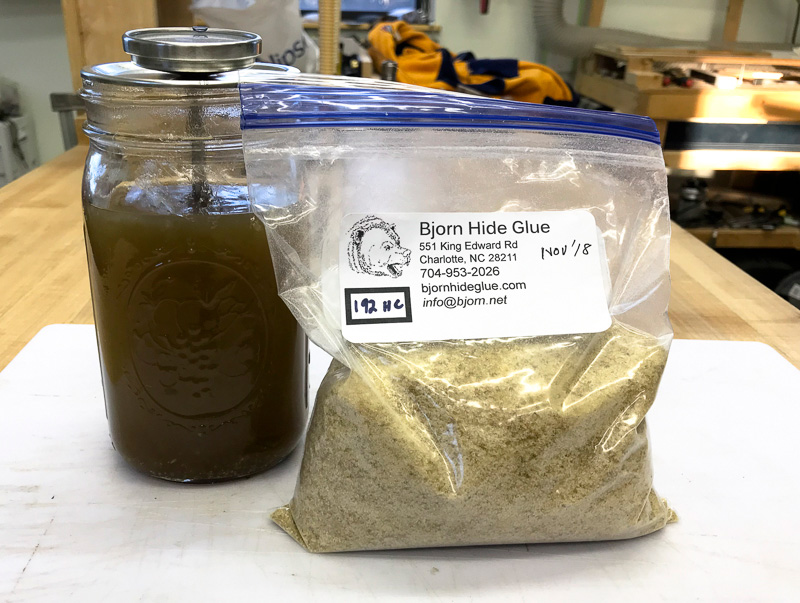
Hide Glue and Glue Pots
As noted earlier, I use hide glue exclusively for my veneer work. I mix my own from granules purchased from my hide glue vendor noted below in Resources. Hide glue is made from rendering mostly cattle hides. If you are curious, the details can be found here.
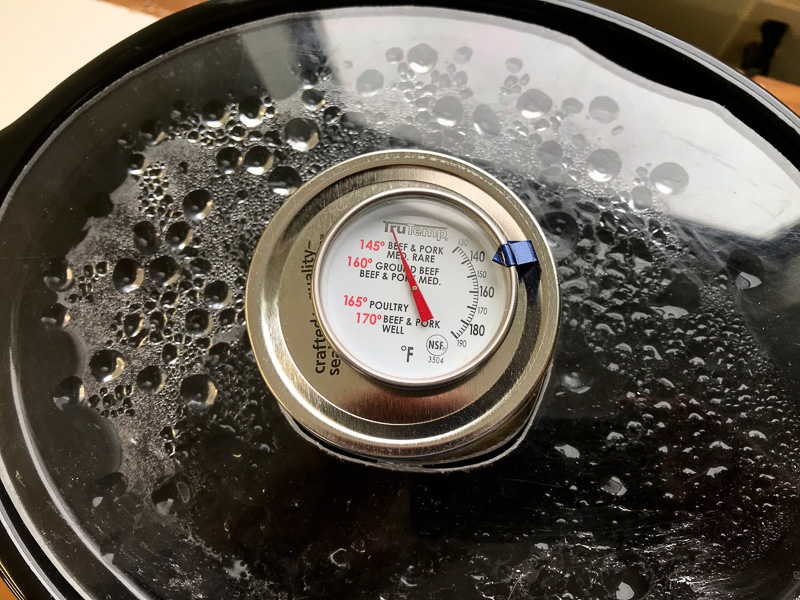
While hide glue takes some preparation to use, its benefits far out weigh this minor prep work. Preparation means mixing the hide glue with water and then heating it to 140-150 degrees. It should never be heated over 150 degrees because this could ruin the hide glue. In general, hide glue is mixed in equal proportions to distilled water. Once the hide glue reaches 140-degrees, you may have to add more water or hide glue to get the correct viscosity. Using a stir stick or a hide glue brush, when raised about 10-inches or so, the glue should begin to drip, not run, from the stick. If it runs, add a bit more glue. If it does not run, more water is required. If the glue is mixed correctly - 1:1 ration, you should not have any viscosity issues. Over time, after it cooks at 140 degrees some water is bound to evaporate, so adding a bit of water may be necessary.
Some interesting characteristics of hide glue are as follows.
Rub Sticks
Prepare two small boards with perfectly flat edges. Apply the hot hide glue to the edges and begin rubbing the two edges together. In no time, it will be very difficult to continue rubbing the boards together. Leave the boards to dry overnight. Do not clamp these boards together, just set them aside. After the glue has set and dried, try to break the hide glue bond. You will find that the boards will break and not the glue bond.
Stradivarius Repair
For the sake of argument, lets say that your two sticks are part of a $1M dollar Stadivarius that was brought to you for repair. The repair consisted, first of all, in separating the two sticks. Using a heat gun, warm the glue seam until the glue melts and then separate the sticks. Little wonder why violin makers use hide glue.
Hide Glue Strength
Hide glue comes in various strengths.

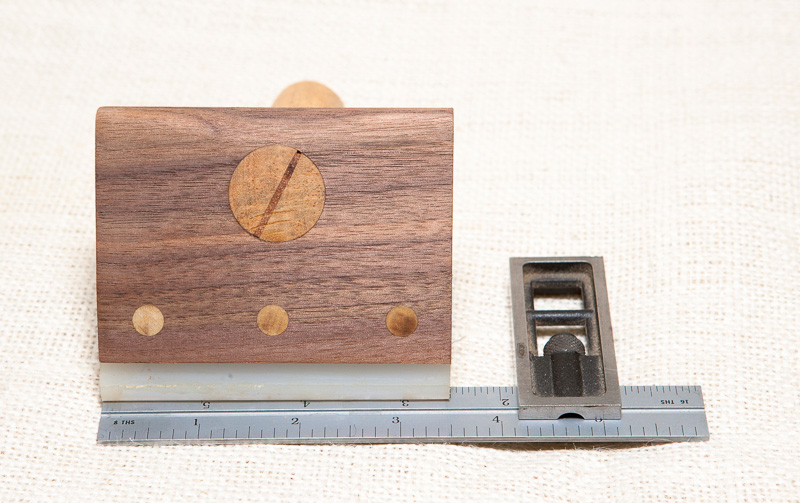
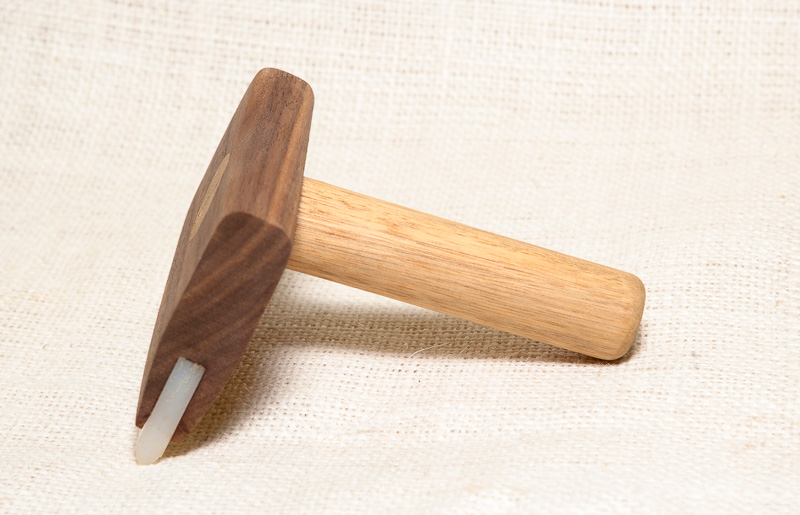
Veneer Hammer Technique
Forth topic ...
Veneer Ironing Technique
Fifth topic ...
Book-Matching
Book-matching is the process of joining two sheets of veneer whose figure are near mirror-images of each other. In other words, the surfaces of the veneer are what you would see if you cut a wide board open. The two surfaces of the cut are "book matches" of each other. When you receive an order of veneer they arrive in the order they were cut from the log. Opening two adjoining sheets (like book pages) from the veneer stack should reveal two nearly identical mirror-images of each other, thus the term "book-matched".
Book-Matching Preparation
One of the most important goals of book-matching is to have a near-invisible joint. Your success - or failure - depends on how well you saw or cut this veneer joint edge.
Pore Filling & French Polishing
Seventh topic ...
Veneer Repair
Eighth topic ...
Veneer repair can mean anything from fixing a tear to filling a void. There are many ways to make veneer repairs. I will cover those that I have experience with.
It is, obviously, always best to avoid any veneer defects if you can. I know only too well, that most of the time this is wishful thinking. More often than not, the part of the veneer sheet that you want for your project will contain one or more defects. You have two options: one, find new veneer you can use that has no defects or, two, bite the bullet and repair the defects in your veneer. We're going to bite the bullet.
Veneer Tears or Splits
Depending on the width of the tear or split, these can often be corrected with pore filler, wood filler or a sliver of matching veneer. As noted above, I use nothing but hot hide glue in my veneer work and minor splits almost vanish when the veneer hammer bonds the veneer to the substrate. This was covered above. Edge tears can be repaired similarly.
Pore Filler
If the tear or split is very thin and not very noticeable, then you may be able to get by simply using your pore filler to fill this narrow split in the veneer. Pore fillers were covered above. It may be preferable to use wood filler rather than rely on the pore filler. You will have to use your own judgement. I have found that experimenting with various types of veneer repairs on test boards is never a waste of time.
Wood Fillers
There are a lot of different brands of wood fillers. And, they are in no way all the same. I prefer Famowood. It comes in two varieties: Original and Latex. I have used both and to date I do not see much difference between either type. However, the I think that the latex may be better due to its elasticiy, meaning it may reduce minute cracks when drying. I have no proof that this is so, but it seems logical to me.
Here is my problem with using wood filler: I normally use a flat, flexible card (expired credit card works perfect) to spread the filler. In so doing, you spread wood filler over veneer not associated with the veneer defect. This is problematic for two reasons: one, you have just made more work for yourself because you have to remove this extraneous wood filler and secondly, too much veneer sanding can destroy your project if you sand through the veneer.
Veneer Addition
In this case, you cut out a matching sliver of veneer and fit it into the veneer tear.
Veneer Voids
Resources
Ninth topic ...
Veneer - VeneerSupplies.com
Hide glue - BjornHideGlue.com
Shellac - shellacfinishes.com